In this article, we will be discussing some useful makeup tips for beginners. Whether you’re new to the world of makeup or just looking to improve your skills, we’ve got you covered. You’ll learn about essential products to have in your collection, how to choose the right shade of foundation, and techniques to achieve a natural everyday look. We’ll also provide some bonus tips and tricks to help you feel more confident and comfortable with your makeup application. So, let’s get started and enhance your makeup game!
Makeup Tips For Beginners
Makeup can be a fun and creative way to enhance your natural beauty and express yourself. However, if you’re new to the world of cosmetics, it can feel overwhelming trying to figure out where to start. Don’t worry, we’ve got you covered. In this article, we’ll provide you with a comprehensive guide of makeup tips for beginners. From determining your skin type to mastering eye makeup techniques, we’ll help you navigate the world of beauty and build a solid foundation for your makeup journey.
Determining Your Skin Type
Before you dive into the world of makeup, it’s important to understand your skin type. The right products and techniques will vary depending on whether you have dry, oily, combination, or sensitive skin. Understanding your skin type will help ensure that you choose products that work for you and avoid any potential issues.
Understanding Different Skin Types
There are four main skin types: dry, oily, combination, and sensitive. Dry skin tends to feel tight and may have flaky patches. Oily skin is characterized by excessive oil production, resulting in shine and potential breakouts. Combination skin has both dry and oily areas, with some parts of the face being oilier than others. Sensitive skin is easily irritated and prone to redness and reactions.
Identifying Your Own Skin Type
To determine your skin type, start by washing your face with a gentle cleanser and patting it dry. Leave your skin bare for an hour or two to allow your natural oils to come through. Afterward, examine your skin. If it feels tight and looks flaky, you likely have dry skin. If your skin appears shiny all over, especially in the T-zone (forehead, nose, and chin), you most likely have oily skin. Combination skin will have areas that are dry and others that are oily. Sensitive skin may feel irritated or develop redness during this time.
Choosing the Right Products for Your Skin Type
Once you’ve determined your skin type, it’s crucial to choose products specifically formulated for your needs. Dry skin benefits from hydrating and moisturizing products, while oily skin requires oil-free and mattifying options. Combination skin may need a combination of both. Sensitive skin should opt for hypoallergenic and fragrance-free products. Remember, always patch test new products on a small area of your skin before applying them to your entire face.
This image is property of resize.indiatvnews.com.
Building a Skincare Routine
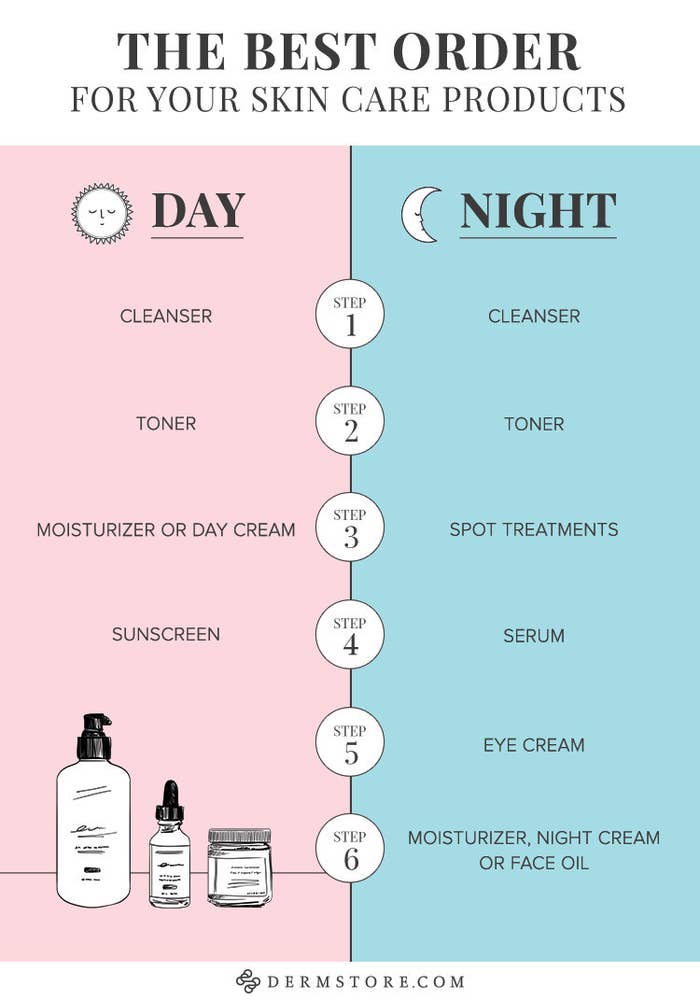
Before diving into makeup application, it’s essential to establish a skincare routine. A good skincare routine sets the foundation for a flawless and long-lasting makeup application. It involves cleansing, toning, moisturizing, and adding sunscreen.
Cleansing
Cleansing is the first step in any skincare routine. It removes dirt, oil, and makeup from your face, leaving your skin clean and refreshed. Choose a gentle cleanser that suits your skin type and massage it onto your damp face in circular motions. Rinse thoroughly with lukewarm water and gently pat dry.
Toning
Toning helps balance the pH level of your skin and prepares it for the next steps of your skincare routine. Select a toner that suits your skin type and apply it using a cotton pad, gently wiping it across your face. Look for toners that hydrate and soothe your skin while restoring its natural balance.
Moisturizing
Moisturizing is a step you should never skip, regardless of your skin type. It helps keep your skin hydrated and prevents dryness. Choose a moisturizer that suits your skin type and apply it to your face and neck, using gentle upward motions. Allow the moisturizer to absorb fully before proceeding to the next step.
Adding Sunscreen
Sunscreen is a crucial step in any skincare routine as it helps protect your skin from harmful UV rays. Apply a broad-spectrum sunscreen with an SPF of 30 or higher, even on cloudy days. Make sure to cover all exposed areas of your face and neck, and reapply every two hours if you’re spending time outdoors.
Choosing the Right Foundation
Foundation is the base of your makeup routine, providing coverage and evening out your skin tone. Choosing the right foundation involves understanding different formulas, determining your skin undertone, and finding the perfect shade.
Understanding Different Foundation Formulas
There are various foundation formulas available, each catering to different skin types and coverage preferences. Liquid foundations offer a natural finish and are suitable for most skin types. Cream foundations provide more coverage and are ideal for dry skin. Powder foundations are lightweight and great for oily skin. BB creams and tinted moisturizers offer a light coverage option.
Determining Your Skin Undertone
Your skin undertone determines the shades of foundation that will suit you best. There are three main undertones: cool, warm, and neutral. Cool undertones have hints of pink or blue, warm undertones have hints of yellow or peach, and neutral undertones have a balance of both. To determine your undertone, examine the veins on your wrist. If they appear blue, you likely have cool undertones. If they appear greenish, you likely have warm undertones. If you can’t really tell, you likely have a neutral undertone.
Finding the Perfect Shade
Finding the perfect shade of foundation can be challenging but is essential for a seamless makeup application. When choosing a foundation shade, test it on your jawline or the side of your face, blending it in. The right shade should seamlessly blend with your natural skin tone, with no noticeable color difference. Consider natural lighting when selecting your shade, as indoor lighting can alter the appearance.
This image is property of dqt8gd4elnkw6.cloudfront.net.
Enhancing Your Eyes
The eyes are often considered the focal point of makeup, and enhancing them can make a significant difference in your overall look. We’ll cover three essential eye makeup techniques: defining your eyebrows, applying eyeshadow, and using eyeliner correctly.
Defining Your Eyebrows
Eyebrows frame your face and can dramatically enhance your features. Brush your eyebrows with a spoolie brush to shape them, then fill in any sparse areas with an eyebrow pencil or powder that matches your natural hair color. Use short, feathery strokes to mimic the appearance of hair for a natural look.
Applying Eyeshadow
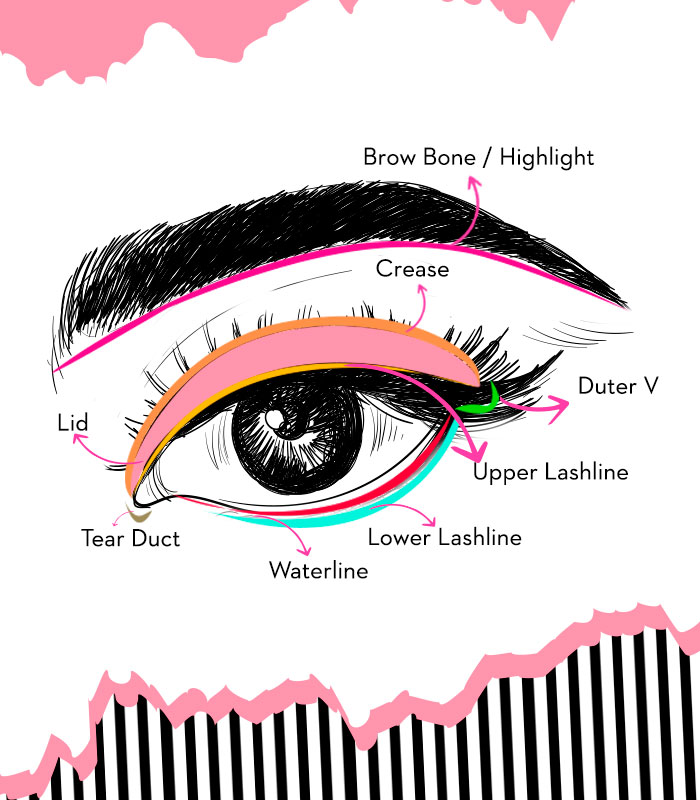
Eyeshadow adds depth and dimension to your eyes, making them appear more captivating. Start by applying a neutral shade all over your eyelid as a base. Then, choose a slightly darker shade for your crease area to add definition. Finally, use a lighter shade to highlight your brow bone and the inner corners of your eyes for an extra pop.
Using Eyeliner Correctly
Eyeliner helps define your eyes and create various looks, from subtle to dramatic. For beginners, start with a pencil or gel eyeliner, as they are easier to control than liquid eyeliner. Gently line your upper lash line, working from the inner to the outer corner, and smudge it slightly for a softer appearance. If you want a more defined look, create a small wing at the outer corner of your eye.
Accentuating Your Lips
Lips are another focal point of makeup, and finding the right techniques to accentuate them can make a big impact on your overall look. We’ll cover three essential lip makeup techniques: choosing the right lipstick shade, applying lip liner, and creating fuller lips.
Choosing the Right Lipstick Shade
When choosing a lipstick shade, consider your undertone and experiment with different colors to find what suits you best. If you have cool undertones, opt for pink, berry, or red shades. If you have warm undertones, go for coral, peach, or brown shades. Neutral undertones can rock a wide range of colors.
Applying Lip Liner
Lip liner helps define your lips and prevents lipstick from bleeding or feathering. Choose a lip liner that matches your lipstick shade or is slightly darker. Starting at the cupid’s bow, trace the natural shape of your lips, then fill them in. This creates a base for your lipstick and helps it last longer.
Creating Fuller Lips
If you desire fuller-looking lips, there are a few techniques you can try. Apply a lip gloss or lip plumper to the center of your lips, adding volume and shine. Overlining your lips slightly with lip liner can also create the illusion of fuller lips. Blend the liner into your lipstick for a seamless look.
This image is property of i.ytimg.com.
Contouring and Highlighting
Contouring and highlighting are techniques used to define and enhance your facial features, creating a more sculpted look. We’ll cover understanding face shapes, contouring to define your features, and highlighting for a radiant glow.
Understanding Face Shapes
There are various face shapes, including oval, round, square, heart, and diamond. Understanding your face shape will help you determine where to apply contour and highlight. Oval faces are considered the most versatile and can suit various techniques.
Contouring to Define Your Features
Contouring involves using a shade slightly darker than your natural skin tone to create shadows, giving the illusion of more defined features. Apply contour product along the hollows of your cheeks, the sides of your nose, and the perimeter of your forehead, blending it out for a seamless finish.
Highlighting for a Radiant Glow
Highlighting involves using a product lighter than your skin tone to bring forward areas and create a beautiful glow. Apply highlighter to the high points of your face, such as the tops of your cheekbones, the bridge of your nose, and the cupid’s bow of your lips. Blend it gently to create a soft and natural radiance.
Blushing and Bronzing
Blushing and bronzing add warmth and color to your complexion, giving you a healthy-looking glow. We’ll cover selecting the right blush for your skin tone and applying bronzer for a sun-kissed look.
Selecting the Right Blush for Your Skin Tone
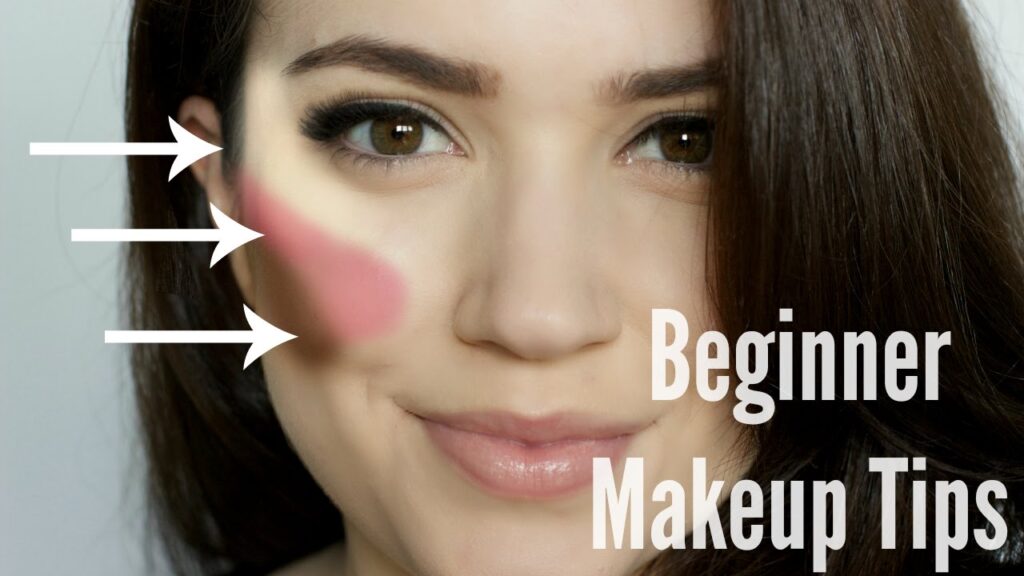
When choosing a blush, consider your skin tone. For fair skin, opt for light pink or peach shades. Medium skin tones can rock peach, coral, or rose shades. Deep skin tones can go for vibrant pinks or deep berries. Apply blush to the apples of your cheeks, blending upward toward your temples for a natural flush.
Applying Bronzer for a Sun-Kissed Look
Bronzer adds warmth and a sun-kissed glow to your complexion. Select a shade that is one or two shades darker than your natural skin tone. Apply bronzer to the areas of your face where the sun naturally hits, such as your forehead, temples, cheekbones, and jawline. Blend it well for an even and natural-looking finish.
This image is property of i.pinimg.com.
Setting Your Makeup
Setting your makeup is essential to ensure its longevity and minimize any smudging or creasing. We’ll cover using setting powder and setting spray for optimal results.
Using Setting Powder
Setting powder helps lock your makeup in place and control shine. Choose a translucent powder or one that matches your skin tone. Use a fluffy brush to lightly dust the powder over your entire face, focusing on areas prone to oiliness or creasing, such as your T-zone.
Setting Spray for Longevity
Setting spray is the final step in setting your makeup and keeping it intact throughout the day or night. Hold the bottle about arm’s length away from your face and mist it over your entire face with a few sprays. Allow it to dry naturally. Setting spray also helps create a more natural and dewy finish.
Mastering Eye Makeup Techniques
Eye makeup can be the most intimidating aspect for beginners, but with practice and the right techniques, you’ll become an expert in no time. We’ll cover a smoky eye tutorial, a winged eyeliner tutorial, and some tips for applying mascara.
Smoky Eye Tutorial
A smoky eye is a classic and versatile eye makeup look that suits various occasions. Start by applying a medium-tone eyeshadow all over your eyelid. Then, apply a darker eyeshadow to your outer corner and blend it into your crease. Use a clean brush to blend and soften any harsh lines. Apply a shimmery eyeshadow to the center of your eyelid and blend it with the darker shade. Finish by lining your upper and lower lash lines with eyeliner and smudging it slightly.
Winged Eyeliner Tutorial
A winged eyeliner adds a touch of sophistication and drama to your eye makeup. Start by drawing a thin line along your upper lash line, extending it slightly past the outer corner of your eye. From the outer corner, draw a line upwards and inwards towards the end of your eyebrow. Connect the line to the initial line, creating a triangular shape. Fill in the triangle, and voila, you have a winged eyeliner!
Tips for Applying Mascara
Mascara helps define and lengthen your lashes, making your eyes appear more open and awake. Start by curling your lashes with an eyelash curler, then apply mascara from the roots to the tips using a wiggling motion. Apply multiple coats for added volume, waiting for each coat to dry before applying the next. Use a clean mascara wand to separate any clumps for a more natural look.
This image is property of img.buzzfeed.com.
Conclusion
Now that you have a solid foundation of makeup tips for beginners, it’s time to embrace the journey of makeup exploration. Remember to have fun and experiment with different colors, techniques, and products to find what works best for you. Makeup is a form of self-expression, so don’t be afraid to get creative and let your personality shine through your beauty routine. With time and practice, you’ll become more confident in your makeup skills and be able to create stunning looks that highlight your unique features. So go ahead, grab your brushes, and let your inner artist unleash!
